- Take off the case. Remove any screws holding the case on and
remove it. Both sides need to be removed for access to the CD ROM
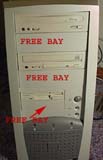
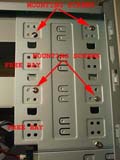
- The CD ROM goes into the large 5.25" bays that are in your
system. Make sure you have a free bay.
|
|
- If replacing the old CD ROM drive remove the screws that hold it
in place there should be two on each side. Sometimes one side is a
little more difficult to get to. On some computers the CD ROM and
other drives use racks to slide in and out; in these cases their
would be no screws.
|
|
- Unplug the IDE cable, power cable, and digital and analog sound
cables that are plugged into the back of the old CD ROM.
|

|
- Pull the old CD ROM out through the front of the case.
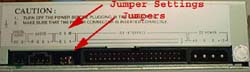
- Note whether your CD ROM is set to Master, Slave, or Single drive
operation. This can usually be found on the back of the drive
between the IDE cable plug-in and the audio cable plug-ins. There
should be a sticker on the drive or words to indicate what the
appropriate settings are for the jumpers.
- Set your new CD ROM to the same settings Master, Slave, or Single.
The jumper might go in a new place on the new drive, depending on
the brand.
|
|
- Slide the new CD ROM or DVD ROM into the bay that the old one came
out of.
- Plug in the audio cables.
- Plug in the IDE cable. Make sure you line up the red line on
the IDE ribbon cable with pin one on the IDE ribbon plug-in. This
usually puts the red wire from the power cable next to the red line
on the IDE ribbon.
- Plug in the power cable.
|
|
- Replace the four screws that were removed originally.
- Before replacing your case turn on the system and verify that the
CD ROM or DVD ROM drive is detected in the startup sequence.
- Congratulations! Enjoy!
|
|


